Bell-Sleeved Jacket
I’m pretty deeply depressed right now and not able to grapple with regular blogging, but here’s some knitting I’ve been doing to pass the time and prove to myself I can accomplish things.
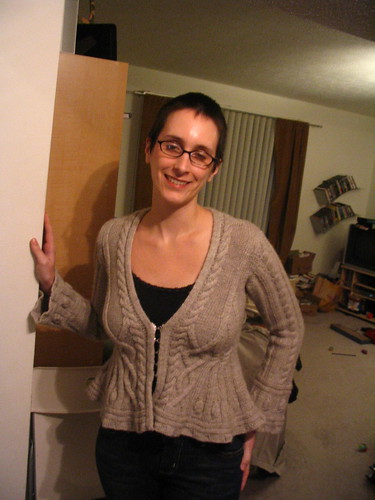 Pattern: #15 Bell Sleeve Jacket, from Vogue Knitting International, designed by Daniel Adamczyk.
Yarn: Naturelle Aran 10-Ply, 100% wool
Gauge: 16 sts/24 rows = 4 inches or 10 cm on US size 6 needles
Size: XS (at my gauge, this gave the Medium width indicated in the pattern)
Knitting Dates: 21 October 2006 - 22 November 2006
Modifications: Many!
I knew from the start that I didn’t want to close the sweater with a belt and decided on hook-and-eye tape instead (although I have to resew it so that the edges fit more tightly than in the photo above). With the yarn I’d chosen, I was more comfortable with the fabric I got at 4 stitches/inch than 5, so I was able to follow the XS instructions to get a Medium width sweater, following the Medium or my own directions for how long to make various pieces.
I quickly decided not to make a collar once it became clear that the collar would be 13 inches long in the back, which seemed excessive. Instead I carried the inner cable up the front and attached it to the back neck, which I made about an inch lower than the pattern called for. I used short rows to shape the back cable part and left an open section to transition from right-curving to left-curving cables. I also changed the way the decreases toward the shoulder worked on the front so I’d end up with the same number of stitches as the back. The picture in the magazine shows a second line of knits with reverse stockinette separating the two, but this is not what the pattern specifies. I also used short rows for the shoulders on front and back, as well as for the back collar opening.
Since I wasn’t attaching the collar, the extra rows on the front edges to which the collar gets attached seemed superfluous and I didn’t much like the idea of matching reverse stockinette to orthogonal stockinette at the bottom. For a bottom edging to the garment, I used a provisional cast-on so I would have free stitches at the end once my seaming was done. I then knitted up the pattern at the bottom of the sleeve, though without the decreases for added bell effect; I just cast on the closest number of stitches to my live stitches that was a multiple of 8 (plus two selvedges for the front edges). I kitchener stitched this bottom flare to the live stitches. This added 2 inches in length, where the pattern-specified reverse stockinette (in my gauge at least) would have been about 0.5 inches.
Last, I worked an edging in double knitting with a garter stitch selvedge (Cast on 8 sts. or other even number. Row one: K1, *k1, slip 1 purlwise with yarn in back,* repeat from * to end. Row 2: *Slip 1 purlwise with yarn in back, k1* repeat from * to end.) I attached it to the garter selvedge on the inside edge of the sweater by alternating mattress stitching one stitch of the sweater to one of the edging and one of the sweater to two of the edging, going in under two stitch bars before coming up for the next stitch on the sweater side. This gave me a tension that didn’t buckle in but also wasn’t floppy. There may be better ways to do this, but it was my first experience with an edging like this.
Thoughts: I really like the changes I made, but I’m not sure they’re enough. I love the way it’s fitted through the bust and at the waist, but after that it flares and flares and flares, which I just don’t think is a great look for me. If I’d been able to add a few inches of fairly straight knitting, maybe another diamond’s worth (and I’m honestly tempted to make another version in which I do that) and then the flare would be down sort of camouflaging my thighs rather than uncomfortably close to my waist. I’m getting better at figuring out what sort of things I should wear, but maybe how to wear them is a bit beyond me. My sweater currently retracts to about 22 inches in length, which is shorter than suggested in the pattern. I’m hoping I can block it aggressively to get out the few extra inches I want. I just have very springy yarn and I’d hoped all the weight at the bottom would hold it down more. I’m frustrated by the how excessive the bottom flare can be but I still love the sweater and what I did with it. I’m hoping blocking will move me into total swooning territory, but I’m proud and it’s warm and perhaps that’s enough. Or maybe I’ll learn from my mistakes and make a second, which could be a lot of fun!
 I finally finished a shawl for my grandmother,
  I used U.S. #7 needles and with such thin yarn the finished product is practically weightless when it’s worn. It’s about 58 inches along the top edge, 29 inches along the central spine that hangs down. I think each side has 11 points along the edge. I could have blocked it bigger, but my grandmother is not as tall as I am and I think this size will be sufficient. I blocked the shawl by soaking it and then pinning it out to the proper dimensions (I ran a piece of yarn through the top horizontal edge to keep it straight) and shape. Since I finished knitting at 11 last night, I ended up making adjustments until midnight and while exhausted, which probably wasn’t the best state of affairs.
 I do think it’s a lovely shawl, light and delicate. I like the repeated leaf pattern that covers it, especially in a light, natural color like this one (although my striped tank top detracts from any simplicity). I think it will be a welcome gift and it has the added advantage of looking more complex than it is. I would recommend this pattern to a first-time lace knitter and it can be expanded to a variety of sizes, from a tiny kerchief to a huge shawl. Mine is midsized, about what you would apparently get with two skeins of
  It’s sweater time again, although this is the last garment I’ll be showing for a while. This is the

 This is Foucault, my six-year-old red-eared slider (Trachemys scripta elegans). He doesn’t actually live in the sink, but I was scrubbing out his tank tonight and figured this was a good opportunity for a photo shoot. Since he’s a mature turtle, his shell is fairly dark now, but I like the combination of various greens and a spot of red and used a color scheme more reminiscent of his looks as a hatchling. I don’t think he’ll get the following that some comics bloggers’ pets have, but that’s okay. Being a turtle, he values his privacy.
 I’m finally getting photos of a sweater I finished more than a month ago. I had been calling this my
  I think I followed the pattern as is except to add 2 inches to the sleeves to accommodate my gorilla-like arms. The hook-and-eye closures are also my innovation (I don’t really want a big, cozy sweater that is open and drafty at the front) although I am in the process of removing the ones I’ve put in and moving them so it will close more tightly. As shown in the back view, there’s plenty of room for layering under this (and the lumpiness is due to my not standing straight).
 With big yarn and needles, this was a very quick knit. I think I spent 3-4 weeks working on it only intermittently. This photo shows the side shaping, which is pretty much all that goes on here. The stitch pattern is so simple that it’s a great mindless project, but the shaping keeps it from being too bulky. I loved the rough, tweedy yarn, and it has softened considerably after one wash. There was quite a bit of vegetable matter in the yarn and I expect to be picking burrs out of it for some time to come, but I’m a sucker for its rustic charm.
 And this, I think, is the best part, what drew me to the sweater. I’ve never seen a crazy bobbled collar like this and it fascinated me. I didn’t do the world’s best job attaching the collar, but I still like the way it looks and it, too, gives the sweater more shape and character than many bulky knits have. All in all, while it was a straightforward and relatively quick project, I do think it’s a fun and comfortable sweater I’ll wear a lot (as weather permits; tonight was not ideal for heavy wool sweaters!) and have around for years to come.
 I did not, however, follow the shaping directions, although I increased or decreased the right number of stitches on the appropriate rows. Instead I decreased and increased in ribbing to get an hourglass shape similar to the one suggested in
  I ended up knitting the lace directly onto the sweater (I did not bind off the neck stitches but left them all on one big circular needle) because I couldn’t figure out a nice way to sew it on. I did 18 lace repeats for the medium size and the neckline is high but not confining. My moment of idiocy was when I didn’t check where I was beginning on the lace, meaning that my seam is quite visible above my left shoulder on the front rather than on the back. I haven’t decided whether this bothers me yet. I may rip out the seam and try to do something more invisible, or maybe this is the time to finally take advantage of the current trend for pinning knit or fabric flowers on shirts. We’ll see.
 I stuck pretty closely to the pattern for a change, knitting on U.S. size 7 needles and using one hank of
  The hemp in the yarn gives it a crisp, almost papery feel and is less stretchy than wool alone. Because of that, I think I lost about one inch in each direction from the dimensions indicated in the pattern. This makes the shawl a bit small for my purposes (though it would have been small anyway) but I think it will still be useful if I close it with a pin rather than trying to tie it.
 All in all, it was an easy and satisfying use of a few days’ knitting time. I’d already used the pattern once before with Noro Lily cotton/silk yarn to make a smaller version for my brother’s girlfriend during the winter. The lace patterns are easy to memorize and once started just keep going. I would definitely consider using the pattern again, perhaps for a slightly larger version with DZined wool/hemp/mohair, which has a bit more sheen and halo. I’m not sure where I’ll have occasion to wear a shawl, but at least now I’m prepared.